Android & Kotlinの環境でマインスイーパーを開発する方法を説明します。
今回は、「プレイ時間」、「リセットボタン」、「残りの爆弾数」、「旗モード切替ボタン」の4パーツをタイルの上に重ねて配置します。

そそたた
今回はパーツの配置のみを実施しています。
各パーツのイメージは仮で、機能も未実装です。
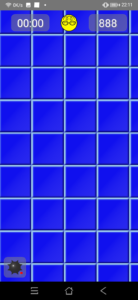
動作イメージ
画面上部に「プレイ時間」、「リセットボタン」、「残りの爆弾数」を「リセットボタン」が中心にくるように配置し、画面下部に「旗モード切替ボタン」を左寄せで配置した動作イメージです。

ソースコード
開発環境は次の通りです。
| PC | MacBook Pro(2016年モデル) |
| IDE | Android Studio 4.0.1 |
| Android SDK | minSdkVersion 16 targetSdkVersion 30 |
| 言語 | Kotlin 1.3.72 |
<?xml version="1.0" encoding="utf-8"?>
<androidx.constraintlayout.widget.ConstraintLayout xmlns:android="http://schemas.android.com/apk/res/android"
    xmlns:tools="http://schemas.android.com/tools"
    android:layout_width="match_parent"
    android:layout_height="match_parent"
    xmlns:app="http://schemas.android.com/apk/res-auto">

    <com.sosotata.minesweeper.ui.widgets.SquareTileGameView
        android:id="@+id/squareView"
        android:layout_width="match_parent"
        android:layout_height="match_parent"/>

    <!-- プレイ時間 -->
    <Chronometer
        android:id="@+id/playTimer"
        android:layout_width="@dimen/time_num_area_width"
        android:layout_height="wrap_content"
        android:layout_marginTop="@dimen/padding_medium"
        android:gravity="center"
        android:background="@drawable/border_text"
        android:text="88:88"
        android:textColor="@android:color/white"
        android:textSize="@dimen/size_time_text"
        android:shadowColor="@color/colorShadowTextView"
        android:shadowDx="@dimen/text_shadow_param"
        android:shadowDy="@dimen/text_shadow_param"
        android:shadowRadius="@dimen/text_shadow_param"
        app:layout_constraintStart_toStartOf="parent"
        app:layout_constraintEnd_toStartOf="@id/resetButton"
        app:layout_constraintTop_toTopOf="parent" />

    <!-- リセットボタン -->
    <ImageView
        android:id="@+id/resetButton"
        android:layout_width="wrap_content"
        android:layout_height="wrap_content"
        android:src="@drawable/reset_button_normal"
        android:layout_marginTop="@dimen/padding_medium"
        app:layout_constraintStart_toEndOf="@id/playTimer"
        app:layout_constraintEnd_toStartOf="@id/bombCountText"
        app:layout_constraintTop_toTopOf="parent" />

    <!-- 残り爆弾数 -->
    <TextView
        android:id="@+id/bombCountText"
        android:layout_width="@dimen/time_num_area_width"
        android:layout_height="wrap_content"
        android:layout_marginTop="@dimen/padding_medium"
        android:gravity="center"
        android:background="@drawable/border_text"
        android:text=" 888 "
        android:textColor="@android:color/white"
        android:textSize="@dimen/size_time_text"
        android:shadowColor="@color/colorShadowTextView"
        android:shadowDx="@dimen/text_shadow_param"
        android:shadowDy="@dimen/text_shadow_param"
        android:shadowRadius="@dimen/text_shadow_param"
        app:layout_constraintStart_toEndOf="@id/resetButton"
        app:layout_constraintEnd_toEndOf="parent"
        app:layout_constraintTop_toTopOf="parent" />

    <!-- 旗モード切替ボタン -->
    <ImageView
        android:id="@+id/modeButton"
        android:layout_width="wrap_content"
        android:layout_height="wrap_content"
        android:layout_margin="@dimen/padding_medium"
        android:background="@drawable/border_text"
        app:layout_constraintBottom_toBottomOf="parent"
        app:layout_constraintStart_toStartOf="parent"
        app:srcCompat="@drawable/mode_bomb" />

</androidx.constraintlayout.widget.ConstraintLayout>
<?xml version="1.0" encoding="utf-8"?>
<shape xmlns:android="http://schemas.android.com/apk/res/android">
<stroke android:width="1dp" android:color="@color/colorTextBorderStroke"/>
<corners android:radius="@dimen/radius_text_border"/>
<padding android:left="@dimen/padding_small" android:top="@dimen/padding_small"
android:right="@dimen/padding_small" android:bottom="@dimen/padding_small"/>
<solid android:color="@color/solidTextBorder"/>
</shape><?xml version="1.0" encoding="utf-8"?>
<resources>
<dimen name="size_time_text">28sp</dimen>
<dimen name="radius_text_border">10dp</dimen>
<dimen name="text_shadow_param">3</dimen>
<dimen name="padding_small">5dp</dimen>
<dimen name="padding_medium">10dp</dimen>
<dimen name="padding_large">15dp</dimen>
<dimen name="padding_xlarge">20dp</dimen>
<dimen name="time_num_area_width">100dp</dimen>
</resources><?xml version="1.0" encoding="utf-8"?>
<resources>
<color name="colorPrimary">#6200EE</color>
<color name="colorPrimaryDark">#3700B3</color>
<color name="colorAccent">#03DAC5</color>
<color name="solidTextBorder">#80808080</color>
<color name="colorShadowTextView">#808080</color>
<color name="colorTextBorderStroke">#80888888</color>
</resources>解説
各パーツの配置方法をざっくり解説します。
画面パーツを配置するレイアウトには、ConstraintLayoutを使用しています。
レイアウトに配置する順番でZオーダーが決まるので、タイルを描画するSquareTileGameViewを最初に全体表示(match_parent)で配置します。
後は、ConstraintLayoutのお作法に乗っ取って各パーツの相対位置を指定しあいながらパズルのように配置します。
各パーツの配置を記述している箇所は、「app:layout_constraint*」の部分になります。
<!-- プレイ時間 -->
<Chronometer
    ・・・
    app:layout_constraintStart_toStartOf="parent"
    app:layout_constraintEnd_toStartOf="@id/resetButton"
    app:layout_constraintTop_toTopOf="parent" />

<!-- リセットボタン -->
<ImageView
    ・・・
    app:layout_constraintStart_toEndOf="@id/playTimer"
    app:layout_constraintEnd_toStartOf="@id/bombCountText"
    app:layout_constraintTop_toTopOf="parent" />

<!-- 残り爆弾数 -->
<TextView
    ・・・
    app:layout_constraintStart_toEndOf="@id/resetButton"
    app:layout_constraintEnd_toEndOf="parent"
    app:layout_constraintTop_toTopOf="parent" />

<!-- 旗モード切替ボタン -->
<ImageView
    ・・・
    app:layout_constraintBottom_toBottomOf="parent"
    app:layout_constraintStart_toStartOf="parent"
    app:srcCompat="@drawable/mode_bomb" />

コメント