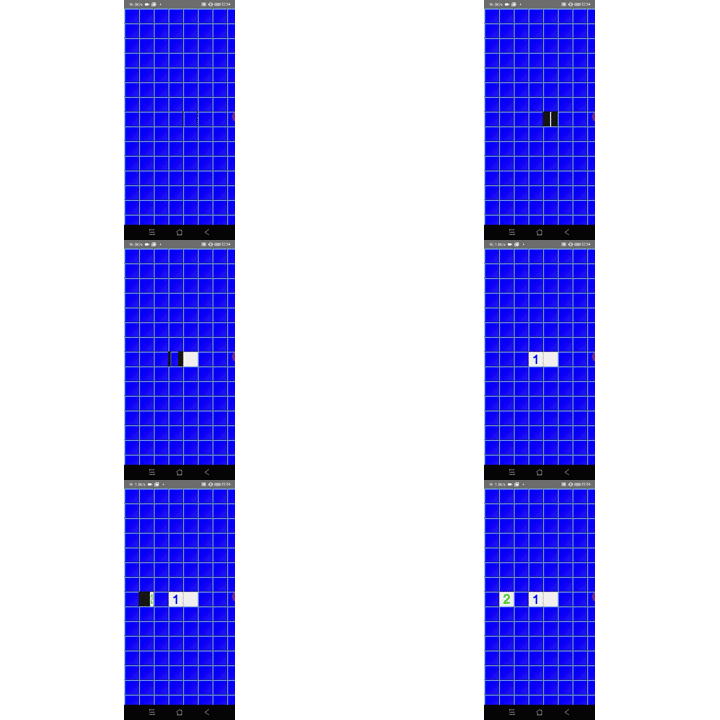
Canvasに描画した画像の一部分だけをクルッと横回転するフリップアニメーションを実装する方法を説明します。
動作イメージ
画面いっぱいに並べて描画したマインスイーパーのタイル(マス)をタッチした部分のみ横回転のフリップアニメーションで開いています。

ソースコード
開発中のマインスイーパーのソースから関連する部分を抜粋して載せておきます。
開発環境は次の通りです。
| PC | MacBook Pro(2016年モデル) |
| IDE | Android Studio 4.0.1 |
| Android SDK | minSdkVersion 21 targetSdkVersion 30 |
| 言語 | Kotlin 1.3.72 |
<?xml version="1.0" encoding="utf-8"?>
<androidx.constraintlayout.widget.ConstraintLayout xmlns:android="http://schemas.android.com/apk/res/android"
    xmlns:tools="http://schemas.android.com/tools"
    android:layout_width="match_parent"
    android:layout_height="match_parent"
    xmlns:app="http://schemas.android.com/apk/res-auto">

    <com.sosotata.minesweeper.ui.widgets.SquareTileGameView
        android:id="@+id/squareView"
        android:layout_width="match_parent"
        android:layout_height="match_parent"/>

    <com.sosotata.minesweeper.ui.widgets.FlipAnimationBackgroundView
        android:id="@+id/flipAnimBackgroundView"
        android:layout_width="match_parent"
        android:layout_height="match_parent"/>

    <com.sosotata.minesweeper.ui.widgets.FlipAnimationView
        android:id="@+id/rotateAnimationView"
        android:layout_width="match_parent"
        android:layout_height="match_parent"/>

</androidx.constraintlayout.widget.ConstraintLayout>
package com.sosotata.minesweeper.ui.widgets
import android.app.Activity
import android.content.Context
import android.graphics.*
import android.util.AttributeSet
import android.view.MotionEvent
import com.sosotata.minesweeper.R
import kotlinx.android.synthetic.main.game_fragment.*
/**
* 四角タイルゲーム画面
*/
class SquareTileGameView : SosotataImageView {
/** X方向タイル数 */
private var mTileNumX: Int = 16
/** Y方向タイル数 */
private var mTileNumY: Int = 16
/** タイル画像リスト */
private val mTiles: MutableList<Bitmap> = mutableListOf()
/** タイル描画用ビットマップ */
private var mSourceBitmap: Bitmap
/** タイル描画用キャンバス */
private var mRenderCanvas: Canvas
/** テスト用インデックス */
private var mTestIndex: Int = 0
/**
* コンストラクタ
*/
constructor(context: Context, attrs: AttributeSet) : super(context, attrs) {
mTiles.add(BitmapFactory.decodeResource(context.resources, R.drawable.b0))
mTiles.add(BitmapFactory.decodeResource(context.resources, R.drawable.b1))
mTiles.add(BitmapFactory.decodeResource(context.resources, R.drawable.b2))
mTiles.add(BitmapFactory.decodeResource(context.resources, R.drawable.b3))
mTiles.add(BitmapFactory.decodeResource(context.resources, R.drawable.b4))
mTiles.add(BitmapFactory.decodeResource(context.resources, R.drawable.b5))
mTiles.add(BitmapFactory.decodeResource(context.resources, R.drawable.b6))
mTiles.add(BitmapFactory.decodeResource(context.resources, R.drawable.b7))
mTiles.add(BitmapFactory.decodeResource(context.resources, R.drawable.b8))
mTiles.add(BitmapFactory.decodeResource(context.resources, R.drawable.bomb))
mTiles.add(BitmapFactory.decodeResource(context.resources, R.drawable.bomb_ng))
mTiles.add(BitmapFactory.decodeResource(context.resources, R.drawable.bomb_hit))
mTiles.add(BitmapFactory.decodeResource(context.resources, R.drawable.bomb_flag))
mTiles.add(BitmapFactory.decodeResource(context.resources, R.drawable.base_square))
mTiles.add(BitmapFactory.decodeResource(context.resources, R.drawable.flag))
mTiles.add(BitmapFactory.decodeResource(context.resources, R.drawable.question))
// 初期状態としてベースタイルを描画する
mSourceBitmap = Bitmap.createBitmap(mTiles[13].width * mTileNumX, mTiles[13].height * mTileNumY, Bitmap.Config.ARGB_8888)
mRenderCanvas = Canvas(this.mSourceBitmap)
for (y in 0 until mTileNumY) {
for (x in 0 until mTileNumX) {
mRenderCanvas.drawBitmap(mTiles[13], (mTiles[13].width * x).toFloat(), (mTiles[13].height * y).toFloat(), null)
}
}
setImage(mSourceBitmap)
}
/**
* [android.view.View.onTouchEvent]
*/
override fun onTouchEvent(e: MotionEvent?): Boolean {
if (e?.action == MotionEvent.ACTION_UP) {
// タッチしたタイルを新しいタイル画像で描画
val values = FloatArray(9)
this.mRenderMatrix.getValues(values)
val i = ((e.x - values[Matrix.MTRANS_X]) / values[Matrix.MSCALE_X] / mTiles[0].width);
val j = ((e.y - values[Matrix.MTRANS_Y]) / values[Matrix.MSCALE_Y] / mTiles[0].height);
mRenderCanvas.drawBitmap(
mTiles[mTestIndex % mTiles.size],
(mTiles[0].width * i.toInt()).toFloat(),
(mTiles[0].height * j.toInt()).toFloat(),
null
)
// タッチしたタイルの領域計算
val rect = RectF()
rect.left = (mTiles[0].width * values[Matrix.MSCALE_X] * i.toInt()) + values[Matrix.MTRANS_X]
rect.top = (mTiles[0].height * values[Matrix.MSCALE_Y] * j.toInt()) + values[Matrix.MTRANS_Y]
rect.right = rect.left + (mTiles[0].width * values[Matrix.MSCALE_X])
rect.bottom = rect.top + (mTiles[0].height * values[Matrix.MSCALE_Y])
// タッチしたタイルの上で横回転のフリップアニメーションを実行する
val act = context as Activity
act.rotateAnimationView.flipAnimate(rect, mTiles[mTestIndex % mTiles.size])
mTestIndex++
}
return super.onTouchEvent(e)
}
}package com.sosotata.minesweeper.ui.widgets
import android.content.Context
import android.graphics.*
import android.util.AttributeSet
import android.view.View
import android.view.animation.Animation
import android.view.animation.Animation.AnimationListener
import android.view.animation.ScaleAnimation
import com.sosotata.minesweeper.R
/**
* 横回転フリップアニメーションビュー
*/
class FlipAnimationView: View {
/** タッチアニメーション用ビットマップ **/
private val mBaseTileImage: Bitmap
/** 描画ビットマップ */
private lateinit var mRenderImage: Bitmap
/** フリップアニメーション背景 */
private var mBackgroundView: FlipAnimationBackgroundView? = null
/** 描画領域 */
private val mRenderRect: RectF = RectF()
/**
* コンストラクタ
*/
constructor(context: Context, attrs: AttributeSet) : super(context, attrs) {
mBaseTileImage = BitmapFactory.decodeResource(context.resources, R.drawable.base_square)
}
/**
* [android.view.View.onDraw]
*/
override fun onDraw(canvas: Canvas) {
if (::mRenderImage.isInitialized) {
canvas.drawBitmap(
mRenderImage,
Rect(0, 0, mRenderImage.width, mRenderImage.height),
mRenderRect, null)
}
super.onDraw(canvas)
}
/**
* 横回転フリップアニメーション背景セット
*/
fun setBackgroundView(vw: FlipAnimationBackgroundView) {
mBackgroundView = vw
}
/**
* 横回転フリップアニメーション
*/
fun flipAnimate(rect: RectF, tileImage: Bitmap) {
mRenderRect.set(rect)
mRenderImage = mBaseTileImage
// アニメーションの背景を描画(これを入れた方が見栄えする)
mBackgroundView?.renderBlackBackground(rect)
mBackgroundView?.visibility = VISIBLE
// 半回転までを真ん中まで縮小するアニメーションで表現
val x = rect.left + rect.width() / 2 // 中心座標X
val y = rect.top + rect.height()/ 2 // 中心座標Y
val shrinkToMiddle = ScaleAnimation(
1.0f, 0.0f, 1.0f,1.0f,
Animation.ABSOLUTE, x, Animation.ABSOLUTE, y)
shrinkToMiddle.duration = 80
shrinkToMiddle.setAnimationListener(object : AnimationListener {
override fun onAnimationStart(animation: Animation) {}
override fun onAnimationRepeat(animation: Animation) {}
override fun onAnimationEnd(animation: Animation) {
mRenderImage = tileImage
// 残りの半回転を真ん中から拡大するアニメーションで表現
val growFromMiddle = ScaleAnimation(
0.0f, 1.0f, 1.0f, 1.0f,
Animation.ABSOLUTE, x, Animation.ABSOLUTE, y)
growFromMiddle.duration = 80
growFromMiddle.setAnimationListener(object : AnimationListener {
override fun onAnimationStart(animation: Animation) {}
override fun onAnimationRepeat(animation: Animation) {}
override fun onAnimationEnd(animation: Animation) {
// 完了したら背景も合わせて非表示
mBackgroundView?.visibility = INVISIBLE
visibility = INVISIBLE
}
})
startAnimation(growFromMiddle)
}
})
startAnimation(shrinkToMiddle)
}
}package com.sosotata.minesweeper.ui.widgets
import android.content.Context
import android.graphics.*
import android.util.AttributeSet
import android.view.View
import com.sosotata.minesweeper.R
/** 横回転フリップアニメーション背景ビュー */
class FlipAnimationBackgroundView: View {
/** 背景領域 */
private val mRect: RectF = RectF()
/**
* コンストラクタ
*/
constructor(context: Context, attrs: AttributeSet) : super(context, attrs)
/**
* [android.view.View.onDraw]
*/
override fun onDraw(canvas: Canvas) {
super.onDraw(canvas)
// 黒背景を描画
val blackPaint: Paint = Paint()
blackPaint.color = Color.BLACK
canvas.drawRect(mRect, blackPaint)
}
/**
* 背景領域を設定して描画更新要求
*/
fun renderBlackBackground(rect: RectF) {
mRect.set(rect)
invalidate()
}
}解説
少しソースコードが長いので要点部分を解説します。
ConstraintLayoutレイアウトにFlipAnimationView(一番上)、FlipAnimationBackgroundView(真ん中)、SquareTileGameView(一番下)の順番で重なるように配置します。
| SquareTileGameView | タイルの描画、タッチイベントを受信する |
| FlipAnimationBackgroundView | フリップアニメーションの黒背景を描画する |
| FlipAnimationView | フリップアニメーションを実行する |

FlipAnimationBackgroundViewを入れているのは、フリップアニメーション時に黒背景を入れた方が見栄えが良かったからです。
SquareTileGameViewでフリップアニメーションが完了するまでタイルを黒で塗りつぶすことでも実現可能です。
次に、SquareTileGameViewでタッチイベントを受信したときに、タッチしたタイルを新しいタイル画像(1とか爆弾とか)に更新し、そのタイルの領域と新しいタイル画像をFlipAnimationView.flipAnimateメソッドに渡します。
    override fun onTouchEvent(e: MotionEvent?): Boolean {
        if (e?.action == MotionEvent.ACTION_UP) {
            // タッチしたタイルを開いたイメージで描画
            val values = FloatArray(9)
            this.mRenderMatrix.getValues(values)
            val i = ((e.x - values[Matrix.MTRANS_X]) / values[Matrix.MSCALE_X] / mTiles[0].width);
            val j = ((e.y - values[Matrix.MTRANS_Y]) / values[Matrix.MSCALE_Y] / mTiles[0].height);
            mRenderCanvas.drawBitmap(
                mTiles[mTestIndex % mTiles.size],
                (mTiles[0].width * i.toInt()).toFloat(),
                (mTiles[0].height * j.toInt()).toFloat(),
                null
            )

            // タッチしたタイルの領域計算
            val rect = RectF()
            rect.left = (mTiles[0].width * values[Matrix.MSCALE_X] * i.toInt()) + values[Matrix.MTRANS_X]
            rect.top = (mTiles[0].height * values[Matrix.MSCALE_Y] * j.toInt()) + values[Matrix.MTRANS_Y]
            rect.right = rect.left + (mTiles[0].width * values[Matrix.MSCALE_X])
            rect.bottom = rect.top + (mTiles[0].height * values[Matrix.MSCALE_Y])

            // タッチしたタイルの上で横回転のフリップアニメーションを実行する
            val act = context as Activity
            act.rotateAnimationView.flipAnimate(rect, mTiles[mTestIndex % mTiles.size])

            mTestIndex++
        }
        return super.onTouchEvent(e)
    }
タイルの描画や領域計算に関して、マトリクスを使った拡大縮小やスクロールを考慮したコードになっているのでややこしいですが、本記事の範囲外のため詳細な説明を割愛します。
ここでは、難しいことを考えずrectにフリップアニメーションしたいタイルの領域を入れているぐらいの理解で進んでください。
次に、フリップアニメーションの実行部分であるFlipAnimationView.flipAnimateメソッドを説明します。
最初にFlipAnimationBackgroundView.renderBlackBackgroundメソッドを呼び出してフリップアニメーションの黒背景を表示します。
    /**
     * 横回転フリップアニメーション
     */
    fun flipAnimate(rect: RectF, tileImage: Bitmap) {
        mRenderRect.set(rect)
        mRenderImage = mBaseTileImage

        // アニメーションの背景を描画(これを入れた方が見栄えする)
        mBackgroundView?.renderBlackBackground(rect)
        mBackgroundView?.visibility = VISIBLE
黒背景を表示すると言ってもFlipAnimationViewの下に配置しているためこの段階では見えません。
横回転のフリップアニメーションは、RotateAnimationでなくScaleAnimationを使って半回転ずつ表面を真ん中まで縮小、裏面を真ん中から拡大するアニメーションを連続で実行します。
最後にFlipAnimationView、FlipAnimationBackgroundViewを非表示にして完了です。
        // 半回転までを真ん中まで縮小するアニメーションで表現
        val x = rect.left + rect.width() / 2    // 中心座標X
        val y = rect.top + rect.height()/  2    // 中心座標Y
        val shrinkToMiddle = ScaleAnimation(
            1.0f, 0.0f, 1.0f,1.0f,
            Animation.ABSOLUTE, x, Animation.ABSOLUTE, y)

        shrinkToMiddle.duration = 80
        shrinkToMiddle.setAnimationListener(object : AnimationListener {
            override fun onAnimationStart(animation: Animation) {}
            override fun onAnimationRepeat(animation: Animation) {}
            override fun onAnimationEnd(animation: Animation) {
                // 描画ビットマップを新しいタイル画像に変更
                mRenderImage = tileImage

                // 残りの半回転を真ん中から拡大するアニメーションで表現
                val growFromMiddle = ScaleAnimation(
                    0.0f, 1.0f, 1.0f, 1.0f,
                    Animation.ABSOLUTE, x, Animation.ABSOLUTE, y)

                growFromMiddle.duration = 80
                growFromMiddle.setAnimationListener(object : AnimationListener {
                    override fun onAnimationStart(animation: Animation) {}
                    override fun onAnimationRepeat(animation: Animation) {}
                    override fun onAnimationEnd(animation: Animation) {
                        // 完了したら背景も合わせて非表示
                        mBackgroundView?.visibility = INVISIBLE
                        visibility = INVISIBLE
                    }
                })
                startAnimation(growFromMiddle)
            }
        })
        startAnimation(shrinkToMiddle)
アニメーションはビュー全体に対して実行されるため、拡大縮小の中心を正しく設定しないと意図通りになりません。


コメント